Spock
Spock is the prefered CLI for sardana. It is based on IPython. Spock automatically loads other IPython extensions like the ones for PyTango and pylab. It as been extended in sardana to provide a customized interface for executing macros and automatic access to sardana elements.
Spock tries to mimic SPEC’s command line interface. Most SPEC commands are available from spock console.
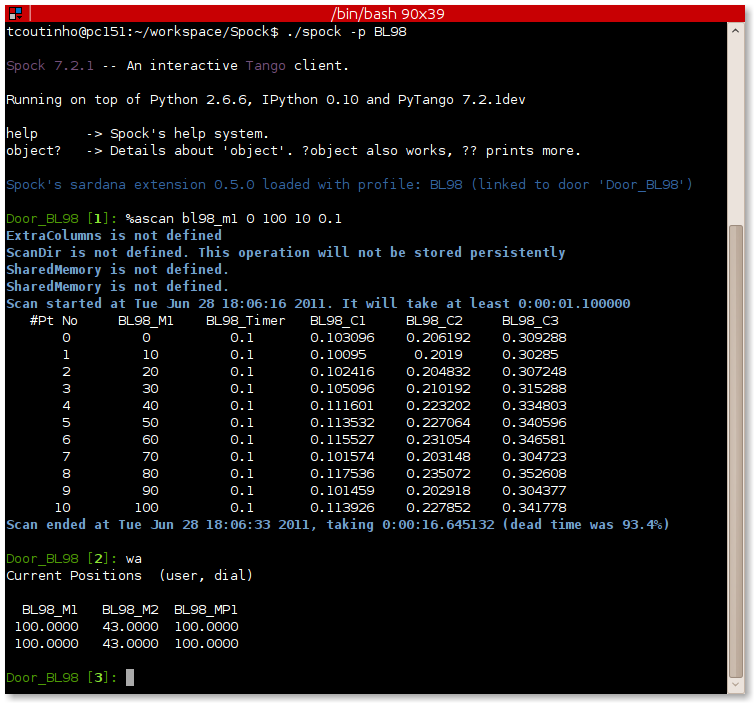
Spock CLI in action
Starting spock from the command line
To start spock just type in the command line:
marge@machine02:~$ spock
This will start spock with a “default profile” for the user your are logged with. There may be many sardana servers running on your system so the first time you start spock, it will ask you to which sardana system you want to connect to by asking to which of the existing doors you want to use:
marge@machine02:~$ spock
Profile 'spockdoor' does not exist. Do you want to create one now ([y]/n)?
Available Door devices from homer:10000 :
On Sardana LAB-01:
    LAB-01-D01 (running)
    LAB-01-D02 (running)
On Sardana LAB-02:
    LAB-02-D01
Please select a Door from the list? LAB-01-D01
Storing ipy_profile_spockdoor.py in /home/marge/.ipython... [DONE]
Note
If only one Door exists in the entire system, spock will automatically connect to that door thus avoiding the previous questions.
Afterward, spock CLI will start normally:
Spock 7.2.1 -- An interactive sardana client.

help      -> Spock's help system.
object?   -> Details about 'object'. ?object also works, ?? prints more.

Spock's sardana extension 1.0 loaded with profile: spockdoor (linked to door 'LAB-01-D01')

LAB-01-D01 [1]:
Starting spock with a custom profile
spock allows each user to start a spock session with different configurations (known in spock as profiles). All you have to do is start spock with the profile name as an option.
If you use ipython version > 0.10 you can do it using –profile option:
spock --profile=<profile name>
Example:
marge@machine02:~$ spock --profile=D1
Otherwise (ipython version 0.10) you can do it using -p option:
spock -p <profile name>
Example:
marge@machine02:~$ spock -p D1
The first time a certain profile is used you will be asked to which door you want to connect to (see previous chapter).
Spock IPython Primer
As mentioned before, spock console is based on IPython. Everything you can do in IPython is available in spock. The IPython documentation provides excelent tutorials, tips & tricks, cookbooks, videos, presentations and reference guide. For comodity we summarize some of the most interesting IPython chapters here:
Executing macros
Executing sardana macros in spock is the most useful feature of spock. It is
very simple to execute a macro: just type the macro name followed by a space
separated list of parameters (if the macro has any parameters). For example,
one of the most used macros is the
wa (stands for “where all”) that
shows all current motor positions. To execute it just type:
LAB-01-D01 [1]: wa

Current Positions  (user, dial)

   Energy       Gap    Offset
 100.0000   43.0000  100.0000
 100.0000   43.0000  100.0000
(user for user position (number above); dial for dial position (number below).)
A similar macro exists that only shows the desired motor positions
(wm):
LAB-01-D01 [1]: wm gap offset
                Gap     Offset
User
 High         500.0      100.0
 Current      100.0       43.0
 Low            5.0     -100.0
Dial
 High         500.0      100.0
 Current      100.0       43.0
 Low            5.0     -100.0
To get the list of all existing macros use
lsmac:
LAB-01-D01 [1]: lsdef
               Name        Module                                            Brief Description
------------------- ------------- ------------------------------------------------------------
             a2scan         scans two-motor scan.     a2scan scans two motors, as specifi[...]
             a2scan         scans three-motor scan .     a3scan scans three motors, as sp[...]
              ascan         scans Do an absolute scan of the specified motor.     ascan s[...]
            defmeas        expert                               Create a new measurement group
              fscan         scans N-dimensional scan along user defined paths.     The mo[...]
                lsa         lists                                   Lists all existing objects
                lsm         lists                                             Lists all motors
              lsmac        expert                                            Lists all macros.
                 mv      standard                   Move motor(s) to the specified position(s)
                mvr      standard            Move motor(s) relative to the current position(s)
                 wa      standard                                     Show all motor position.
                 wm      standard                   Show the position of the specified motors.
<...>
Stopping macros
Some macros may take a long time to execute. To stop a macro in the middle of its execution type Control+c.
Macros that move motors or acquire data from sensors will automatically stop all motion and/or all acquisition.
Exiting spock
To exit spock type Control+d or exit() inside a spock console.
Getting help
spock not only knows all the macros the sardana server can run but it also information about each macro parameters, result and documentation. Therefore it can give you precise help on each macro. To get help about a certain macro just type the macro name directly followed by a question mark(‘?’):
LAB-01-D01 [1]: ascan?

Syntax:
        ascan <motor> <start_pos> <final_pos> <nr_interv> <integ_time>

Do an absolute scan of the specified motor.
    ascan scans one motor, as specified by motor. The motor starts at the
    position given by start_pos and ends at the position given by final_pos.
    The step size is (start_pos-final_pos)/nr_interv. The number of data points collected
    will be nr_interv+1. Count time is given by time which if positive,
    specifies seconds and if negative, specifies monitor counts.

Parameters:
        motor : (Motor) Motor to move
        start_pos : (Float) Scan start position
        final_pos : (Float) Scan final position
        nr_interv : (Integer) Number of scan intervals
        integ_time : (Float) Integration time
Moving motors
A single motor may be moved using the
mv motor position macro.
Example:
LAB-01-D01 [1]: mv gap 50
will move the gap motor to 50. The prompt only comes back after the motion as finished.
Alternatively, you can have the motor position displayed on the screen as it is
moving by using the umv macro
instead. To stop the motor(s) before they have finished moving, type
Control+c.
You can use the mvr motor
relative_position macro to move a motor relative to its current position:
LAB-01-D01 [1]: mvr gap 2
will move gap by two user units.
Counting
You can count using the ct value
macro. Without arguments, this macro counts for one second using the active
measurement group set by the environment variable ActiveMntGrp.
Door_lab-01_1 [1]: ct 1.6

Wed Jul 11 11:47:55 2012

  ct01  =         1.6
  ct02  =         3.2
  ct03  =         4.8
  ct04  =         6.4
To see the list of available measurement groups type
lsmeas. The active measuremnt group
is marked with an asterisk (*):
Door_lab-01_1 [1]: lsmeas

  Active        Name   Timer Experim. channels
 -------- ---------- ------- -----------------------------------------------------------
    *       mntgrp01    ct01 ct01, ct02, ct03, ct04
            mntgrp21    ct04 ct04, pcII0, pcII02
            mntgrp24    ct04 ct04, pcII0
to switch active measurement groups type
senv ActiveMntGrp mg_name.
You can also create, modify and select measurement groups using the expconf command
Scanning
Sardana provides a catalog of different standard scan macros. Absolute-position
motor scans such as ascan,
a2scan and
a3scan move one, two or three motors
at a time. Relative-position motor scans are
dscan,
d2scan and
d3scan. The relative-position scans
all return the motors to their starting positions after the last point. Two
motors can be scanned over a grid of points using the
mesh scan.
Continuous versions exist of many of the standard scan macros (e.g.
ascanc,
d3scanc,
meshc,…). The continuous scans
differ from their standard counterparts (also known as step scans) in that
the data acquisition is done without stopping the motors. Continuous scans are
generally faster but less precise than step scans, and some details must be
considered (see Scans).
As it happens with ct, the scan
macros will also use the active measurement group to decide which experiment
channels will be involved in the operation.
Here is the output of performing an
ascan of the gap in a slit:
LAB-01-D01 [1]: ascan gap 0.9 1.1 20 1
ScanDir is not defined. This operation will not be stored persistently. Use "senv ScanDir <abs directory>" to enable it
Scan #4 started at Wed Jul 11 12:56:47 2012. It will take at least 0:00:21
 #Pt No    gap       ct01      ct02      ct03
  0        0.9          1       4604      8939
  1       0.91          1       5822      8820
  2       0.92          1       7254      9544
  3       0.93          1       9254      8789
  4       0.94          1      11265      8804
  5       0.95          1      13583      8909
  6       0.96          1      15938      8821
  7       0.97          1      18076      9110
  8       0.98          1      19638      8839
  9       0.99          1      20825      8950
 10          1          1      21135      8917
 11       1.01          1      20765      9013
 12       1.02          1      19687      9135
 13       1.03          1      18034      8836
 14       1.04          1      15876      8901
 15       1.05          1      13576      8933
 16       1.06          1      11328      9022
 17       1.07          1       9244      9205
 18       1.08          1       7348      8957
 19       1.09          1       5738      8801
 20        1.1          1       4575      8975
Scan #4 ended at Wed Jul 11 12:57:18 2012, taking 0:00:31.656980 (dead time was 33.7%)
Scan storage
As you can see, by default, the scan is not recorded into any file. To store your scans in a file, you must set the environment variables ScanDir and ScanFile:
LAB-01-D01 [1]: senv ScanDir /tmp
ScanDir = /tmp

LAB-01-D01 [2]: senv ScanFile scans.h5
ScanFile = scans.h5
Sardana will activate a proper recorder to store the scans persistently (currently, .h5 will store in NeXus format. All other extensions are interpreted as SPEC format).
You can also store in multiples files by assigning the ScanFile with a list of files:
LAB-01-D01 [2]: senv ScanFile "['scans.h5', 'scans.dat']"
ScanFile = ['scans.h5', 'scans.dat']
Viewing scan data
Sardana provides a scan data viewer for scans which were stored in a NeXus
file. Without arguments, showscan
will show you the result of the last scan in a GUI:
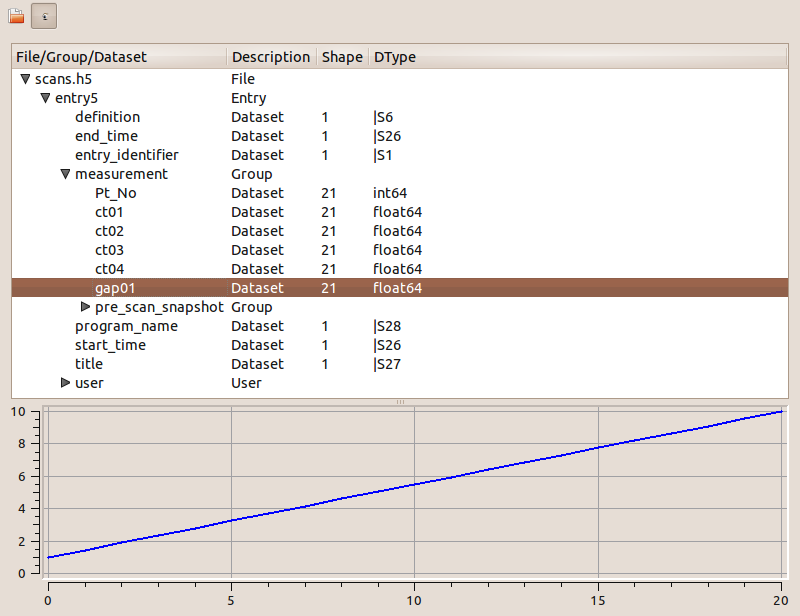
Scan data viewer in action
showscan scan_number will display
data for the given scan number.
The history of scans is available through the
scanhist macro:
LAB-01-D01 [1]: scanhist
   #                           Title            Start time              End time        Stored
 --- ------------------------------- --------------------- --------------------- -------------
   1    dscan mot01 20.0 30.0 10 0.1   2012-07-03 10:35:30   2012-07-03 10:35:30   Not stored!
   3    dscan mot01 20.0 30.0 10 0.1   2012-07-03 10:36:38   2012-07-03 10:36:43   Not stored!
   4   ascan gap01 10.0 100.0 20 1.0              12:56:47              12:57:18   Not stored!
   5     ascan gap01 1.0 10.0 20 0.1              13:19:05              13:19:13      scans.h5
Accessing macro data
The command macrodata allows to retrieve the data of the last macro run in spock.
If this macro does not provide any data an error message is thrown.
Example accesing scan data:
Door_1 [9]: ascan mot17 1 10 2 1
ScanDir is not defined. This operation will not be stored persistently. Use "expconf" (or "senv ScanDir <abs directory>") to enable it
Scan #2 started at Tue Feb 13 11:16:18 2018. It will take at least 0:00:05.048528
0         1         1         3         4      0.865325
1        5.5        1         3         4      2.51148
2         10        1         3         4      4.16662
Scan #2 ended at Tue Feb 13 11:16:24 2018, taking 0:00:05.201949. Dead time 42.3% (motion dead time 40.5%)
#Pt No    mot17      ct17      ct19      ct20       dt
Door_1 [10]: r = %macrodata
Door_1 [11]: r[0].data.keys()
Result [11]:
['point_nb',
'timestamp',
'mot17',
'haso111n:10000/expchan/ctctrl05/4',
'haso111n:10000/expchan/ctctrl05/1',
'haso111n:10000/expchan/ctctrl05/3']
Door_1 [12]: r[0].data['point_nb']
Result [12]: 0
Door_1 [13]: r[0].data['mot17']
Result [13]: 1.0
Door_1 [16]: r[0].data['haso111n:10000/expchan/ctctrl05/1']
Result [16]: 1.0
Editing macros
The command edmac allows to edit the macros
directly from spock. See Writing macros section.
Debugging problems
Spock provides some commands that help to debug or recognize the errors in case a macro fails when being executed.
wwwprints the error message from the last macro executiondebugused withonas parameter activates the print out of the debug messages during macro execution. Set it tooffto deactivate it.post_mortemprints the current logger messages. If no argument is specified it reads thedebugstream. Valid values areoutput,critical,error,warning,info,debugandresult.
Using spock as a Python console
You can write any Python code inside a spock console since spock uses IPython as a command line interpreter. For example, the following will work inside a spock console:
LAB-01-D01 [1]: def f():
           ...:     print("Hello, World!")
           ...:
           ...:

LAB-01-D01 [2]: f()
Hello, World!
Using spock as a Tango console
As metioned in the beggining of this chapter, the sardana spock automatically
activates the PyTango ‘s ipython console extension. Therefore all Tango
features are automatically available on the sardana spock console. For example,
creating a DeviceProxy will work inside the sardana spock
console:
LAB-01-D01 [1]: tgtest = PyTango.DeviceProxy("sys/tg_test/1")

LAB-01-D01 [2]: print( tgtest.state() )
RUNNING
Footnotes
| [1] | The PyTango ipython documentation can be found here: ITango |